









1. The Home Studio Question
The ring light is set up. The camera is positioned. The accessories are in place. Your videos look good—but could they look better?
This question crosses every creator’s mind sooner or later. You watch your favorite creators and notice something different about their lighting. Their videos look more dimensional, more polished, more professional. They seem to glow from within rather than being lit from one direction.
The secret is not always a bigger camera or expensive lenses. Often, the difference comes down to how many lights they use. One light is good. Two lights are better. Three or more create studio-quality results.
This ring light home studio setup guide compares single-light, dual-light, and multi-light configurations. You will learn what each setup achieves, how much it costs, and which one fits your content style and budget.
Whether you are adding a second light or building a full studio, everything starts with choosing the right primary light source—our ring light size guide helps you pick the perfect base. And once you have your lights, you may want to explore the accessories that make multi-light setups work seamlessly.

2. The Single-Light Setup
2.1 What It Is
A single-light setup uses exactly one ring light as the primary and only light source. The ring light is positioned directly behind or slightly above the camera, pointing at your face.
2.2 What It Achieves
Even, shadow-free illumination on your face
The signature ring-shaped catchlight in your eyes
Simple, quick setup (under 5 minutes)
Affordable entry point
2.3 Limitations
Flat lighting with minimal depth
No separation between you and the background
Shadows can still appear on one side if light is off-center
Limited creative control
2.4 Best For
Talking-head videos
Video calls and Zoom meetings
New creators on a budget
Quick content production
Our guide to choosing the right ring light size helps you select the perfect base light for your single-light setup.
3. The Two-Light Setup
3.1 What It Is
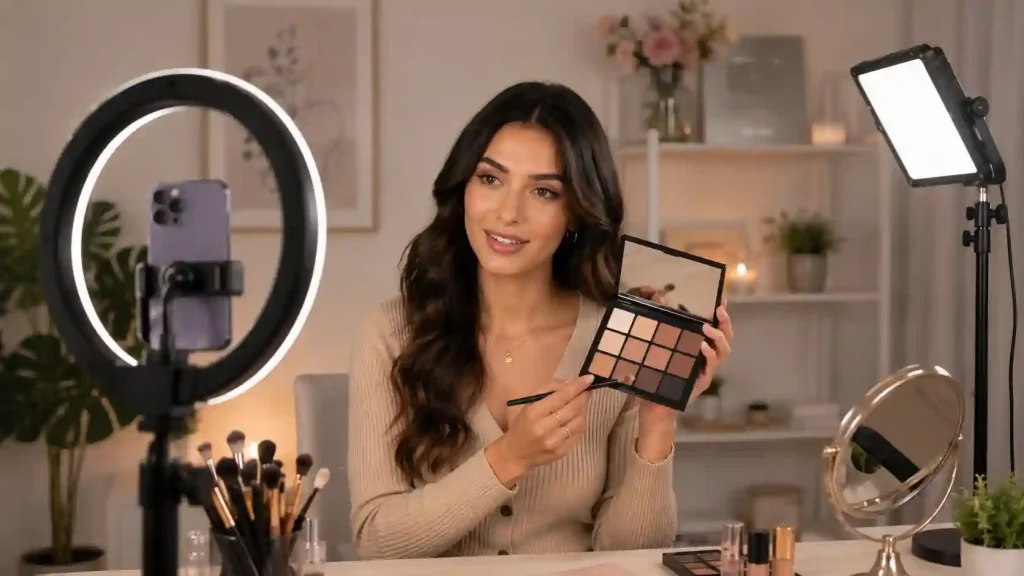
A two-light setup uses a ring light as the primary light source, positioned behind or above the camera. A second light—often a smaller LED panel, a softbox, or even a second ring light—is placed at a 45-degree angle to the subject as a fill light.
3.2 What It Achieves
All the benefits of a single ring light
Three-dimensional lighting with visible depth
Reduced shadows on the opposite side of the face
Professional separation from the background
More flattering facial structure
3.3 Secondary Light Options
| Option | Best For | Cost | Pros | Cons |
|---|---|---|---|---|
| Small LED panel | General fill | $30-60 | Portable, adjustable | Less soft than diffused options |
| Softbox | Beauty, portraits | $60-120 | Very soft light, professional | Bulky |
| Second ring light | Symmetrical setups | $50-100 | Matches main light perfectly | Overkill for fill only |
| Daylight desk lamp | Budget option | $0-20 | Cheap, accessible | Hard to adjust, inconsistent |
3.4 Positioning Guide
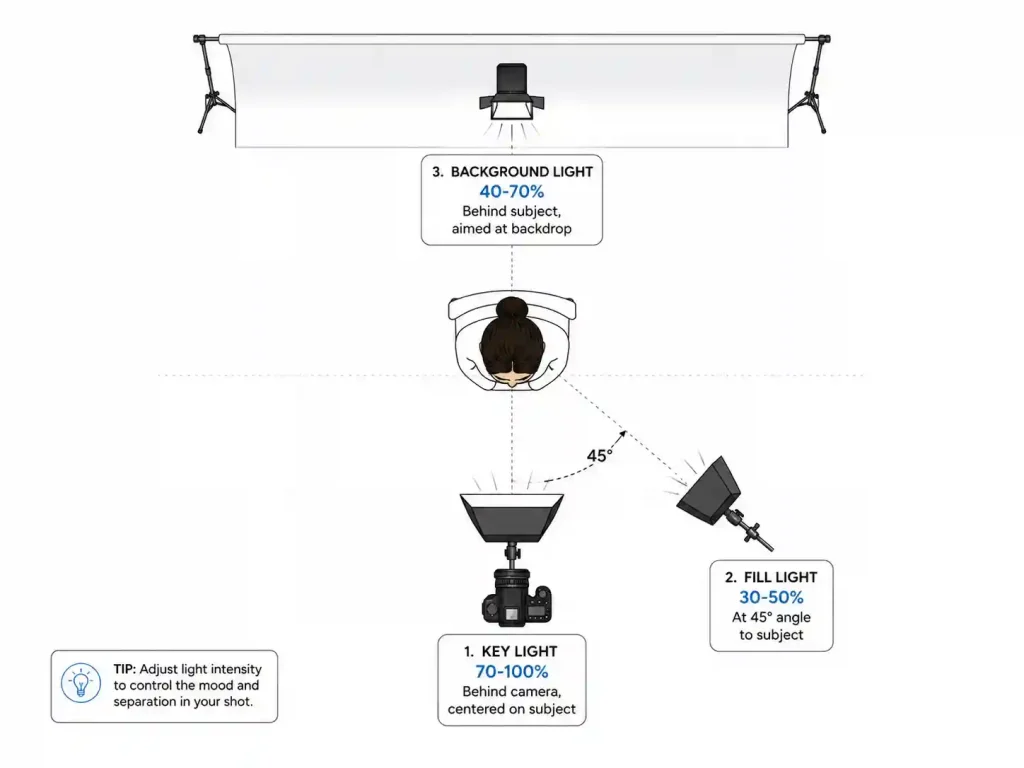
Key light (ring light): Behind camera, at eye level, 18-24 inches from face. Brightness at 70-100%.
Fill light (secondary): 45 degrees to the side of your face, slightly lower than the key light. Brightness at 30-50% of the key light.
3.5 Best For
Professional talking-head videos
Makeup tutorials
Product reviews
Creators who want to stand out
Once you have your main light in place, the next question is whether one light is enough—or if you need a second light, a background light, or a full multi-light studio setup to achieve the production value you are aiming for.

4. The Three-Light Setup
4.1 What It Is
A three-light setup adds a background or rim light to the two-light configuration. This third light is positioned behind the subject, pointing at the background or creating a rim light effect on the subject’s hair and shoulders.
4.2 Lighting Roles
| Light | Position | Purpose | Typical Brightness |
|---|---|---|---|
| Key light | Behind/above camera | Primary illumination, catchlight | 70-100% |
| Fill light | 45° side, slightly lower | Soften shadows, add depth | 30-50% |
| Background light | Behind subject, pointing at backdrop | Separate subject from background | 40-70% |
| Rim light (alternative) | Behind subject, pointing at hair/shoulder | Edge definition, dramatic effect | 50-80% |
4.3 What It Achieves
Three-dimensional separation from background
Professional studio aesthetic
Complete control over lighting ratios
High-end production value
4.4 Best For
Professional product photography
High-end beauty and fashion content
Brand collaborations and sponsored content
Creators who have outgrown basic setups
4.5 Cost Consideration
A three-light setup typically costs $200-500+ depending on the quality of lights and stands. The investment pays for itself through higher brand rates, better content quality, and professional credibility.
According to professional studio lighting for content creators, creators who invest in multi-light setups report noticeably higher engagement and brand interest.
5. Quick Comparison Table
| Feature | 1-Light Setup | 2-Light Setup | 3-Light Setup |
|---|---|---|---|
| Depth and dimension | Minimal | Good | Excellent |
| Shadow control | Limited | Significant | Complete |
| Background separation | None | Some | Full |
| Setup time | 5 minutes | 10-15 minutes | 15-20 minutes |
| Equipment cost | $50-150 | $100-300 | $200-500+ |
| Best for | Beginners | Most creators | Professionals |
| Production value | Good | Professional | Studio-grade |
6. Choosing the Right Setup for Your Needs
6.1 Decision Flow
Are you a beginner or on a tight budget? Start with one light. You can always add more later.
Do you create content weekly or more? Invest in two lights. The difference in quality justifies the cost.
Is content creation your primary income? Build toward a three-light setup. It signals professionalism to brands and viewers.
Do you work with products or makeup? Two lights minimum. Color accuracy and depth matter for product-based content.
Do you work with a small space? Two lights are the practical maximum. Three lights require more space.
6.2 Scenarios
| Content Type | Recommended Setup | Why |
|---|---|---|
| Gaming/chat stream | 1-light | Minimal lighting needed, focus on personality |
| Beauty tutorial | 2-light | Even illumination for makeup details |
| Product review | 2-light | Product colors need accurate representation |
| Professional interview | 2-light | Professional depth without overcomplication |
| Brand collaboration | 3-light | Studio-grade production value |
| Product photography | 3-light | Complete control over highlights and shadows |
7. Adding Lights Without Replacing Your Ring Light
You do not need to replace your existing ring light to expand your setup. Here is how to add lights gradually:
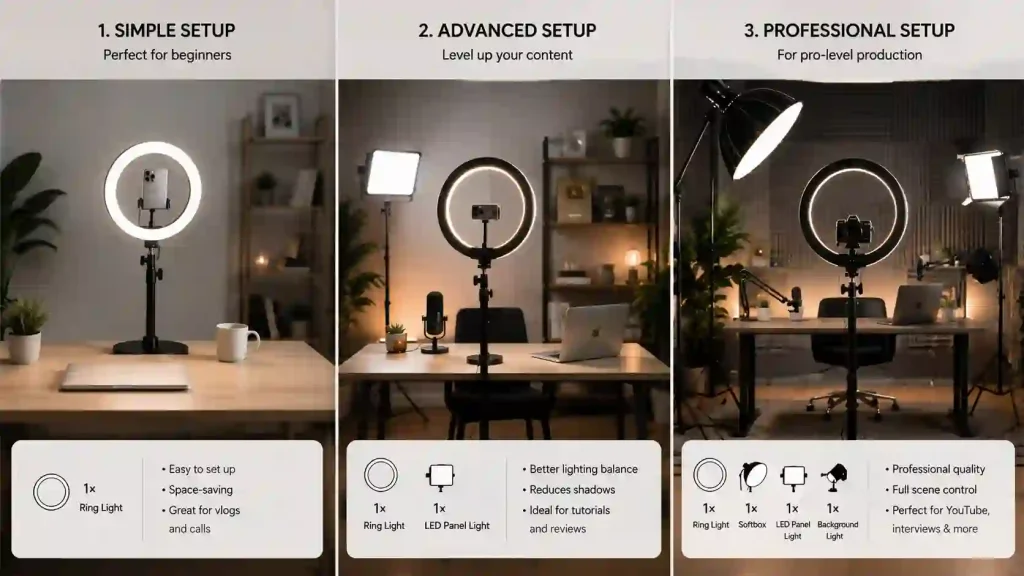
Step 1: Start with one ring light. Master the basics: position, brightness, color temperature, and diffusion.
Step 2: Add a fill light. A small LED panel or softbox complements your ring light. Position it at 45 degrees to fill shadows.
Step 3: Add a background light. Any basic LED panel works for background separation. Even a desk lamp with a daylight bulb can serve as a basic background light.
Step 4: Upgrade individual components. Replace the fill light with a higher-quality option. Add a rim light. Upgrade your key light to CRI 95+.
A high-CRI ring light ensures consistent color across all your light sources.
8. Common Setup Mistakes
Mistake 1: One light, but expecting studio results. A single ring light cannot achieve the depth and separation of a multi-light setup. Adjust your expectations or add more lights.
Mistake 2: Mismatched color temperatures. If your ring light is set to 5600K and your fill light is 3200K, the mixed lighting looks inconsistent and unprofessional. Match the color temperature of all lights.
Mistake 3: Fill light too bright. The fill light should be visibly dimmer than the key light. If it is too bright, it washes out the face and reduces depth.
Mistake 4: Background light too bright. The background light should create separation without drawing attention. If it competes with the key light, it distracts from the subject.
Mistake 5: Lights positioned incorrectly. Each light has a specific role and position. Follow the positioning guidelines in this ring light home studio setup guide to maximize each light‘s effectiveness.
9. Case Examples
Example 1: Beginner Streamer
Content: Twitch gaming stream
Budget: $80
Setup: 14-inch ring light with diffuser and stand
Result: Clean, professional talking-head footage. Enough for engaging streams.
Example 2: Beauty Creator
Content: Makeup tutorials on TikTok and YouTube
Budget: $250
Setup: 16-inch ring light (key) + 12-inch LED panel (fill)
Result: Even illumination, professional depth, accurate colors. Brand collaboration inquiries increased.
Example 3: Professional Content Creator
Content: Sponsored content, product photography, interviews
Budget: $500
Setup: 18-inch ring light (key) + softbox (fill) + LED panel (background)
Result: Studio-grade production value. Creators report their brand collaboration rates increased by 40% after upgrading to a three-light setup.
10. Final Verdict
| You Are… | Recommended Setup | Next Step |
|---|---|---|
| Just starting out | 1-light | Master the basics |
| Creating regularly | 2-light | Add a fill light |
| Professional | 3-light | Build toward studio-grade |
| Limited space | 2-light | Small LED panel as fill |
The jump from one light to two lights is the most noticeable upgrade you can make. It transforms flat, amateur footage into professional-looking content with depth and dimension.
If you are on a budget, start with one ring light and build gradually. Master each step before adding the next light.
If you create content professionally, invest in a two-light setup as soon as possible. The improved quality will pay for itself through better engagement, higher brand rates, and professional credibility.
A note from Seminglight – We manufacture professional ring lights and studio lighting solutions for creators at every level. Browse our collection or contact us for volume pricing.