








1. The Shipment You Cannot Afford to Get Wrong
You have placed your order. The deposit is paid. The factory has started production. Now you are waiting for the shipment to arrive.
But here is the question: what happens between production and delivery?
If you are like most buyers, the answer is “nothing.” You wait. The factory ships. You hope for the best.
That is a mistake. The quality control window between production and shipment is your last opportunity to catch defects before they reach your customers. Once the container leaves the factory, your leverage disappears. Returns become expensive. Replacement orders take weeks. And your customers—who trusted you—pay the price.
This guide covers what to inspect, how to test, and which defects to reject before your UV lash light order ships.
If you are still selecting a manufacturer, see our manufacturer selection guide for a five-step framework.
2. Why Pre-Shipment Inspection Matters
Pre-shipment inspection (PSI) is the process of inspecting goods before they leave the factory. It is your last chance to identify defects, missing items, and specification mismatches before the shipment is on the water.
2.1 The Cost of Skipping Inspection
| Scénario | Coût |
|---|---|
| Defects caught before shipment | Replacement cost + slight delay |
| Defects caught after arrival | Replacement cost + return shipping + customs + lost customers |
| Defects caught by customers | Refunds + replacements + reputational damage |

The math is simple: a $300 inspection can save you thousands in returns, replacements, and reputational damage.
2.2 What PSI Covers
A proper PSI covers:
Quantity check: Are all units accounted for?
Specification check: Does the product match the approved sample?
Function test: Does every unit work?
Inspection visuelle : Are there cosmetic defects?
Packaging check: Is the packaging correct and intact?
According to quality control best practices, pre-shipment inspection is the most cost-effective quality intervention in the supply chain. It catches issues when they are still at the factory—before they become your problem.
3. The Inspection Checklist
Here is what to check during a UV lash light PSI.
3.1 Quantity and Packaging
| Check | Ce qu'il faut rechercher |
|---|---|
| Quantity | Count units against the order confirmation |
| Emballage | Are boxes intact? Correct branding? Correct language? |
| Accessories | Are all accessories included? (cable, manual, foot pedal, etc.) |
| Labeling | Are model numbers and certifications correctly labeled? |
3.2 Visual Inspection
Check each unit for:
Scratches, scuffs, or dents on the housing
Uneven finish or discoloration
Misaligned components (lens, buttons, ports)
Correct logo placement and clarity
Clean lens with no dust, residue, or fingerprints
3.3 Functional Testing
Every unit should be tested before shipment. For UV lash lights, functional testing includes:
| Test | Ce qu'il faut vérifier |
|---|---|
| Power on/off | Does the lamp power on reliably? |
| Foot pedal | Does it activate the lamp every time? |
| Timer presets | Do the preset times work correctly? |
| Brightness/intensity | Does it adjust smoothly? |
| USB charging | Does it charge properly? |
| Gooseneck | Does it hold position? |
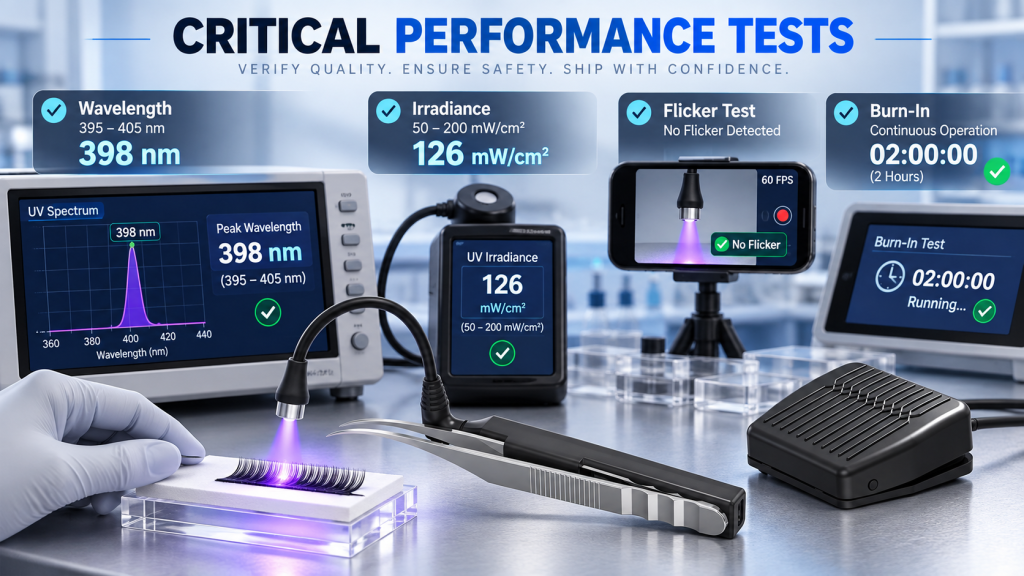
3.4 Critical Performance Tests
These are the tests that matter most for UV lash lights—and the ones most often skipped.
Test de longueur d'onde : Use a spectrometer to verify the peak wavelength is within specification (typically 395–405nm ±5nm).
Essai d'irradiance : Measure the UV power at the working distance (2–5 cm). Professional lamps should deliver 50–200 mW/cm².
Flicker test: Use a phone camera in video mode to check for visible flicker. If you see bands or lines, the driver may have issues.
Test de rodage : Run the lamp for 2–4 hours to catch early failures. A lamp that works for 5 minutes but fails after 2 hours is a defect waiting to happen.
Our UV lash lights undergo full QC testing including wavelength and irradiance verification.
4. Sampling vs. 100% Inspection
Not every order needs 100% inspection. But some do.
4.1 When to Sample
For large orders (1,000+ units), statistical sampling is standard practice. The AQL (Acceptable Quality Limit) standard defines how many units to inspect and how many defects are acceptable.
Common AQL levels:
AQL 1.0: Critical defects (safety, function)
AQL 2.5: Major defects (function, appearance)
AQL 4.0: Minor defects (cosmetic)
For UV lash lights, I recommend AQL 1.0 for critical defects and AQL 2.5 for major defects. Minor cosmetic defects are acceptable at AQL 4.0.
4.2 When to Inspect 100%
For orders under 500 units, 100% inspection is affordable and worth it. You are paying for every unit—you should verify every unit.
For custom or OEM orders, 100% functional testing is essential. The first production run is your highest-risk batch. Inspect it thoroughly.
4.3 Third-Party Inspection
For large orders or first-time suppliers, consider hiring a third-party inspection company like SGS, TUV, or Intertek. The cost is typically $200–$500 per inspection day—a small price for peace of mind.
According to sourcing best practices, third-party inspection is especially important for first orders because it verifies both the product quality and the supplier‘s honesty.
5. Defect Classification: What to Reject
Not all defects are equal. Classify them so you can make consistent decisions.
| Defect Type | Examples | Action |
|---|---|---|
| Critical | Safety hazards, non-functional units, wrong wavelength | Reject entire batch |
| Major | Functional issues, significant cosmetic defects | Reject affected units |
| Minor | Small scratches, slight color variation | Accept with discount or reject if excessive |
Critical defects are non-negotiable. A UV lash light that emits the wrong wavelength or has an electrical safety issue is a liability. Reject the batch.
Major defects affect function or appearance significantly. If more than 2–3% of units have major defects, reject the affected units and negotiate a discount.
Minor defects are cosmetic and do not affect function. Accept them within reason—but if the percentage is high, negotiate a discount or rework.
5.1 The “Golden Sample” Rule
Before production begins, approve a “golden sample”—a unit that represents the exact specifications you expect. During inspection, compare production units against the golden sample.
If the production units differ from the golden sample in any meaningful way, that is a defect. The golden sample is your reference standard.
We provide golden samples and full QC documentation for every order.
6. What to Do When You Find Defects
Finding defects is not a failure. Finding them and accepting them is.
6.1 Document Everything
Take photos and videos of every defect. Record the quantity, the defect type, and the unit serial numbers (if available). This documentation is your evidence in negotiations.
6.2 Communicate Immediately
Contact the supplier immediately. Do not wait for the shipment to arrive. The longer you wait, the less leverage you have.
6.3 Negotiate a Resolution
Les options disponibles sont les suivantes :
Rework: The factory fixes the defects before shipment
Replacement: The factory replaces defective units
Discount: The factory reduces the price to compensate for defects
Rejection: You reject the batch and cancel the order
The right resolution depends on the severity and quantity of defects. For critical defects, reject. For minor defects, negotiate a discount.
6.4 Hold the Balance Payment
If you have not paid the balance yet, this is your leverage. Do not release the balance payment until the defects are resolved.
7. Preventing Defects Before They Happen
The best quality control happens before production, not after.
7.1 Define Specifications Clearly
Vague specifications lead to vague quality. Define every critical parameter:
Wavelength: 395nm ±5nm
Irradiance: ≥200 mW/cm² at 3 cm
Certifications: IEC 62471, CE, RoHS
Materials: Aluminum housing, Grade-A LED chips
Finish: Matte black, no visible defects
7.2 Approve a Golden Sample
The golden sample is your reference standard. Approve it before production begins. Keep one copy at the factory and one copy at your office.
7.3 Conduct In-Process Checks
If you can, visit the factory during production or request video updates. Catching issues during production is cheaper than catching them after.
7.4 Include QC Requirements in the Contract
Your purchase agreement should specify:
Inspection standards (AQL levels)
Testing requirements (wavelength, irradiance, function)
Defect classification (critical, major, minor)
Remedies for non-compliance
According to procurement best practices, quality requirements should be documented in the contract—not discussed verbally.
8. Verdict final
| Point à retenir | Action |
|---|---|
| PSI is your last chance | Inspect before shipment, not after arrival |
| Test the critical parameters | Wavelength, irradiance, flicker, burn-in |
| Sample or 100% inspect | 100% for small orders, AQL for large orders |
| Classify defects | Critical, major, minor |
| Use a golden sample | Approve it before production |
| Document everything | Photos, videos, quantities |
| Hold the balance payment | Your leverage until defects are resolved |

Quality control is not glamorous. It is not the part of sourcing that anyone talks about. But it is the difference between a shipment that delights your customers and one that damages your brand.
The inspection window between production and shipment is short. Use it. Test the critical parameters. Document the defects. Negotiate a resolution. And hold your balance payment until you are satisfied.
Your customers will never see the inspection report. But they will see the quality of the product. And that is what matters.
Article connexe sur les extensions de cils UV
Un message de Seminglight – We provide full QC documentation, golden samples, and third-party inspection support for every UV lash light order. Lampes à cils UV with verified quality. Découvrez notre collection de faux cils UV ou nous contacter for wholesale pricing and quality documentation.
Jim Jiang

Fondateur de Seming, concepteur en chef de produits avec 20 ans d'expérience. Spécialisé dans la personnalisation, l'innovation et les solutions d'éclairage pour la photographie, l'éclairage de beauté et les outils de beauté, et plus encore.