








1. Why Your Salon Needs a UV SOP
Adopting UV lash technology without a standardised operating procedure is like buying a professional camera and never reading the manual. The equipment works—but you‘ll never get the best results.
A UV lash system salon SOP is the difference between inconsistent retention and flawless results across your entire team. When every artist follows the same cadence, uses the same equipment settings, and applies the same safety protocols, your salon delivers predictable, professional results every time.
This guide provides a complete, implementable SOP for UV lash services—from pre-service preparation to post-service aftercare, with troubleshooting, safety protocols, and team training frameworks included.
Descubre las lámparas UV profesionales para pestañas for your salon SOP.
For a detailed breakdown of UV technical specifications, see our technical specs guide.
2. Pre-Service Preparation (5-7 Minutes)
Every successful UV lash service begins with proper preparation. This phase sets the foundation for retention, safety, and client comfort.
2.1 Client Consultation and Consent
Before any service, document the client‘s lash health, density, oiliness, and any history of sensitivities. According to the VTCT Level 3 Individual Eyelash Extensions unit specification, beauty therapists must “recognise any contra-indications and take the necessary action” and “ensure the client‘s records are completed and signed by you and the client” . The same standard requires that “informed and signed parent or guardian consent is obtained for minors prior to any treatment” .
2.2 Cleansing and Drying
The lash line must be completely clean and oil-free before any adhesive application. Use a lash-safe cleanser, rinse thoroughly, and pat dry completely. Any residual oil or makeup will compromise the UV adhesive bond.
The SQA (Scottish Qualifications Authority) unit standard for eyelash services emphasises the importance of correct preparation: “cleanse, prepare and protect the eyelash area” before proceeding with any lash enhancement treatment .
2.3 Eye Protection
This is non-negotiable. Both client and artist must wear appropriate eye protection before the UV lamp is turned on. As the Australian SHBBFAS001 unit standard notes, practitioners must “prepare and protect your client and yourself to meet legal and organisational requirements” .
Protection protocol:
Apply eye pads on the lower lashes
Position silicone protective pads on the upper eyelid to shield from UV rays
Both client and technician must wear UV-blocking glasses (blocking UVA up to 400 nm) throughout the entire application
2.4 Lamp Setup and Verification
Position the UV lamp so the light can accurately target the adhesive zone. The distance is typically 2–5 cm from the lash line . Test the lamp on a guide card or your hand before beginning the service.
Quick pre-service checklist :
Client questionnaire and consent on file
Eye pads placed; eye protection fitted (client and technician)
Lash line cleaned and fully dried
Distancia de la lámpara probada en mano/tarjeta guía
Preajuste de temporizador seleccionado (según especificaciones del adhesivo)
For safety accessories like black eye patches and UV test cards, see our safety protocol guide.
3. The Application Cadence (Repeat per Lash)
This is the core of the UV application workflow. Follow this sequence for every single lash or fan.
Step 1: Isolate the Natural Lash
Use tweezers to separate the target natural lash from adjacent lashes. Proper isolation prevents “stickies” and ensures each extension bonds to only one natural lash.
As the Noble Lashes UV guide explains, the UV method gives the artist “total control over bonding time, preventing premature drying and allowing for perfect placement on the natural lash” .
Step 2: Dip the Extension
Pick up a small amount of adhesive—a micro-bead approximately 1–2 mm in length . Avoid exposing the glue droplet to UV light during application to prevent premature curing.
Step 3: Place the Extension
Position the extension on the natural lash (top or underside per your technique) at the correct distance from the lash line. As the VTCT unit standard requires, practitioners must “leave a gap between the eyelash extension and the eyelid” and “remove excess adhesive throughout the attachment process” .
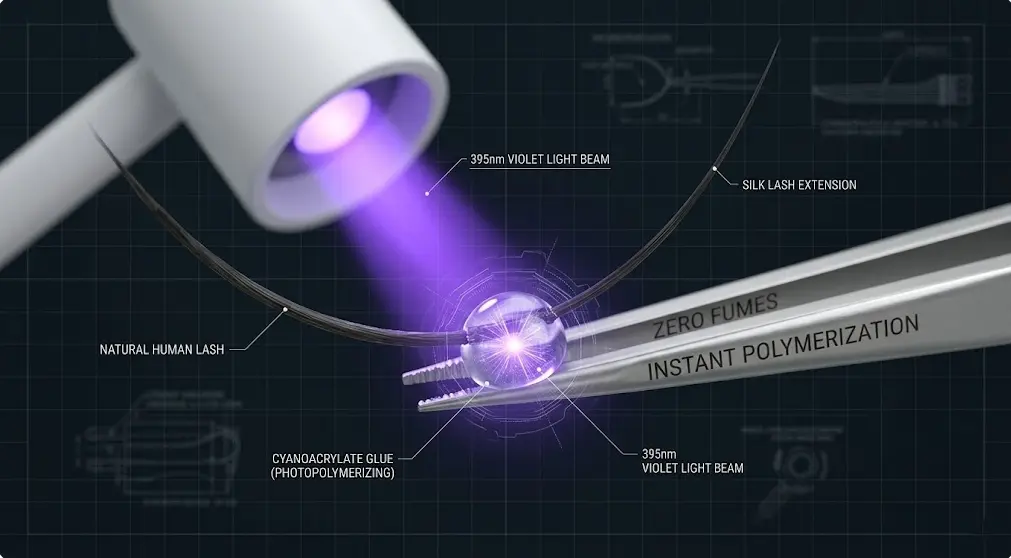
Step 4: Cure Immediately
Activate the UV lamp for the specified time—typically 1–2 seconds . Do not delay between placement and curing. If the adhesive “skins over” before UV exposure, you‘ll get a shell that looks set but lacks internal bond strength .
The SQA standard notes the importance of attaching extensions in a way that takes into account “the factors influencing the treatment” —which for UV systems includes the timing of the cure.
Step 5: Verify Adhesion
Gently probe the bond to confirm it is secure, then proceed to the next lash. The Xtreme Lashes FlashCure system demonstrates that this workflow enables artists to achieve “fuller coverage, having 0 stickies, and a seamless application” without stressing about environmental conditions .
Consejo profesional: Avoid long delays between placement and cure. A long pause can create a thin “skin” that sets the surface while leaving the interior under-cured .
Echa un vistazo a nuestras lámparas de secado UV para pestañas for consistent 1-2 second curing.
4. Placement Strategies That Improve Retention
Beyond the basic cadence, specific placement techniques can significantly improve retention.
4.1 Underside vs. Topside Placement
Underside placement often improves mechanical interlock and protects the bond from frontal rubbing . This is the preferred method for many UV lash artists, particularly for active clients.
4.2 Fan Fit and Fiber Count
For pre-made fans, touch and micro-sweep the fan base approximately 1 mm before curing to ensure uniform adhesive distribution . Size fans to match the natural lash load capacity—oversized fans reduce retention regardless of glue quality.
As Seming‘s expert guide notes, “No lamp can overcome an overloaded lash” . Use a lash load chart to map safe fiber counts per natural lash diameter and health.
4.3 Even Adhesive Spread
Avoid “bulbs” or “burrs” at the base—these are signs of too much glue or poor spreading . A true micro-bead of adhesive (1–2 mm) is sufficient for a strong bond.

5. Fill Protocol (Fast and Clean)
Refills are a significant portion of salon revenue. A standardised fill protocol ensures efficiency and retention.
Fill workflow :
Cleanse → rinse → blot dry
Eliminar las extensiones crecidas
Re-clean if residue persists (oils, makeup)
Resume standard cadence: isolate → dip → place → cure
The SQA unit standard requires practitioners to “replace eyelashes required, minimising damage to the client‘s natural eyelashes” and “achieve a well-balanced look that meets the client‘s requirements” .
6. Troubleshooting Guide
Use this section to train your team. Print it, laminate it, and keep it at each station.
A issue: Early Fallouts (1-3 Days)
| Likely Cause | Corregir |
|---|---|
| Exposición UV insuficiente (tiempo, ángulo o distancia) | Increase exposure time; realign the lamp to target the lash base |
| Shadows from hands or tools blocking the beam | Train a non-blocking hand path; confirm no tools block the beam |
| Adhesive “skinned over” before curing | Tighten the cadence: place → cure immediately |
| Oversized fans for the client‘s natural lash | Reajustar las dimensiones del ventilador para aumentar su resistencia; reducir el peso |
B issue: Ends Lift; Bond Feels “Crunchy” or “Brittle”
| Likely Cause | Corregir |
|---|---|
| Exceso de adhesivo que crea una cáscara gruesa y quebradiza | Reduce glue volume to a true micro-bead |
| Cure applied while the extension was misaligned | Hold extension firmly during cure; ensure correct placement angle |
| Glue partially cured on the tray due to ambient UV light | Mantenga el pegamento protegido de los rayos UV; sustituya las gotas con frecuencia. |
C issue: Great First Week, Then Retention Drops
| Likely Cause | Corregir |
|---|---|
| Client aftercare issues (oil, steam, rubbing) | Reinforce aftercare verbally + printed card |
| Adhesive not fully polymerised internally | Add 0.5–1 second to curing time; verify with gentle tug test |
D issue: Adhesive Appears Set but Pops Under Probe
| Categoría de talla | Diámetro | Lo mejor para | Compensación clave |
|---|---|---|---|
| Pequeño | 6–10 pulgadas | Videollamadas, selfies, viajes, primeros planos del rostro | Portátil, pero con una cobertura limitada |
| Medio | 12–14 pulgadas | TikTok, YouTube, tutoriales de belleza, estudios caseros | El “punto óptimo” para la mayoría de los creadores |
| Grande | 16–18+ pulgadas | Estudios profesionales, fotos de cuerpo entero, maquilladores | Amplia cobertura, pero es voluminoso y menos fácil de transportar |
7. Safety, Hygiene, and Maintenance
7.1 Eye Protection
Both client and technician must wear appropriate UV-blocking glasses throughout the entire application. As Noble Lashes emphasises, “Protective glasses are a must-have for every stylist—they shield your eyes and skin from exposure” . Never look directly into the active UV light .
7.2 Skin and Mucosa Protection
Keep beams focused on the bond line only
Do not cure over exposed skin unnecessarily
For highly sensitive clients, use the lowest effective intensity and shortest proven exposure time
The Seminglight safety protocol recommends using carbon-black eye patches with 99.9% light absorption at 395nm, compared to only 10–15% absorption from standard white hydrogel patches . These patches act as a “dead zone” for stray light, ensuring zero UV-A exposure to the periorbital skin .
7.3 Lamp Maintenance
Clean lamp housings, arms, and shields daily with approved wipes
Avoid solvent contact with lenses or filters unless the manufacturer allows it
Track lamp hours; replace heads or arrays per manufacturer specifications
Inspect cables, joints, and clamps weekly for wear
7.4 The UV Test Card Protocol
A UV test card is a colour-changing diagnostic tool that provides real-time verification of your lamp’s output . The Seminglight safety SOP recommends a pre-service “Proof of Safety” ritual:
Reacción positiva: The card changes colour, proving the lamp is active and the wavelength is correct
Faint Lavender: Weak power or wavelength drift—check power supply or replace LED
No Colour Change: Equipment failure—stop service immediately
UV lash lights with IEC 62471 safety certification meet the highest safety standards.
8. Team Training Framework
1: Theory (1–2 Hours)
Science of UV polymerisation
Lamp specifications, safety rules, and eye protection
How UV curing differs from traditional methods
2: Dry Runs (2–4 Hours)
Ejercicios de cadencia (aislar → sumergir → colocar → curar) en maniquíes.
Práctica de alineación de lámparas y eliminación de sombras
Hand path training to avoid blocking the beam
3: Supervised Models (4–8 Hours)
Cronometraje en directo y seguimiento de la retención
Feedback inmediato con repetición de vídeo
Artists work under supervision until they demonstrate consistent results
4: Certification and QC
Practical exam: timing, placement consistency, safe cure
Retention audit at 1 and 3 weeks
Coach to target metrics
KPIs to Monitor
| KPI | Por qué es importante |
|---|---|
| Tiempo medio de fraguado | Measures efficiency improvement |
| Caídas de 1-3 días | Early indicator of curing issues |
| 3 semanas de retención | Ultimate measure of bond quality |
| Tasa de reprocesamiento | Identifies training gaps |
| Tasa de adhesión de los minoristas | Measures aftercare compliance |

9. Veredicto final
| Conclusión principal | Acción |
|---|---|
| Pre-service prep | Cleanse, protect, and verify lamp settings every time |
| Application cadence | Isolate → dip → place → cure immediately |
| Retention strategies | Underside placement; correct fan sizing; even adhesive spread |
| Troubleshooting | Use the Issue → Cause → Fix guide to coach your team |
| Seguridad | Eye protection for both client and artist—no exceptions |
| Formación | Phase-based rollout: theory → drills → supervised models → certification |
A UV lash system salon SOP is not just a document—it‘s the foundation of consistent, professional results across your entire team. The UV method eliminates humidity dependence and variable curing times, but it requires discipline in execution .
As the Xtreme Lashes experience shows, artists who master the UV cadence consistently report “0 stickies,” “seamless application,” and renewed excitement about lashing—without stressing about room temperature or humidity .
Start with the pre-service checklist. Train the cadence. Use the troubleshooting guide. Your team will deliver faster, more consistent results, and your clients will notice the difference.
Una nota de Seminglight – Fabricamos productos profesionales Luces UV para pestañas with 395nm wavelength precision, focused beam optics, and IEC 62471 safety certification—the equipment your SOP depends on. Descubre nuestra colección de pestañas UV o Contacto for wholesale pricing and training support.
Jim Jiang

Fundador de Seming, diseñador jefe de productos con 20 años de experiencia. Especializado en personalización, innovación y soluciones de iluminación para iluminación fotográfica, iluminación de belleza y herramientas de belleza, y mucho más.